Mounting Devices to a Wall or Backboard

I wanted to mount an Apple TV, an HDHomerun, and a Ring doorbell transformer to a wall, but none of these devices have tabs or screw holes for wall mounting.  Happily, I found a way to easily and inexpensively wall mount equipment even if the device specifically designed with mounting in mind.

There are a lot of expensive or complicated mounting options, but then there are cheaper AND better options. Specialized mounting brackets are available for many devices, but they can be stupidly expensive and then I'd have to wait for shipping.  Or I could 3D print some brackets. 

My solution? I simply use zip ties and strategically placed screw-down cable tie mounts. Zip ties are very strong, and the screw mounts can be used to anchor down the zip ties while also preventing the devices from sliding out of position.

This is actually far less wasteful than a specialty bracket. Special brackets use a lot of plastic. Zip ties may seem disposable, but they are actually reusable unless you're lazy, and they can last for decades (that's longer than your equipment will last). It can cost far less than 10¢ in supplies to mount a device - try to find a custom-designed bracket for that price! Measuring by weight, cost, waste, or effort, zip ties are my preferred mounting option.

Here are some examples of how I have mounted "unmountable" devices using this technique:

The Apple TV HD is designed to sit on a horizontal surface, but I wanted it mounted to the wall. Plastic brackets are available, but they can be inflexible and expensive. My solution is to screw one zip clip above and one below the Apple TV, and then lash it down with a single tie. Note that the cable mounts closely butt against the Apple TV. If and when I need to remove the Apple TV, I can just slide it out and later slide it back in.
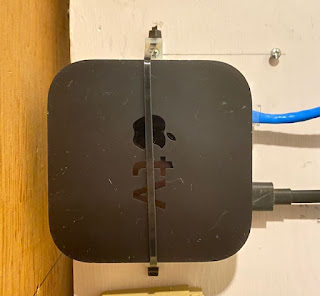

Apple TV, secured with two clips and one tie.

If necessary, the Apple TV can be temporarily slid out of position

My HDHomeRun is also designed to sit on a horizontal surface. Instead, I mounted the HDHR to the wall by screwing down two zip tie cleats, one on each side. Then I lashed it down using a zip tie across it. I screwed a third "tieless" cleat underneath the HDHR to prevent it from sliding down. I can remove the HDHR by sliding it up out of position.
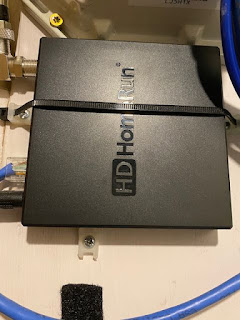
HDHR mounted with a zip tie and three clips


My Honeywell Transformer is used to power my Ring Wired doorbell. Normally this huge power brick would be plugged into my power strip, but then it'd be precarious and take up a lot of power outlet space. Instead, I lashed in place using a zip tie and two cleats. A short extension cord is used to plug it into the power strip.
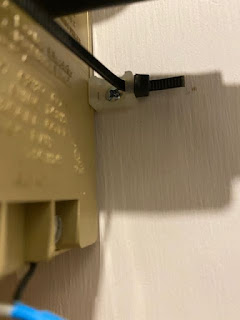
Ring Wired Doorbell transformer, lashed down for neatness

This GL.iNet Mango router is mounted with a zip tie and three cleats. Like the HDHR, the bottom mount is merely used to prevent the Mango from sliding around.

GL.iNet Mango, lashed down with a zip tie and three clips
GL.iNet Mango Router, lashed down with a zip tie and three clips


There you have it. Let me know if you have better ways to attach devices without mounting points to a backboard.

Popular posts from this blog

Fixing a SodaStream Jet, part 1: Disassembly Guide

I've had my SodaStream Jet for years, and once in a while something has gone wrong. Disassembly is the first step to repair.  Start with this article to see how to disassemble the SodaStream, and then once you have that down, scroll through my other articles to see how I repaired specfic SodaStream problems. SodaStream Jet Disassembly Guide Tools Required Flat head screwdriver Phillips head screwdriver 1. Remove the Carbonator.  Duh. 2. Remove the black panel lever The front big black tilt lever needs to be removed first. Removing this panel is tricky, but it isn't impossible. Looking up at the bottom of the black panel, there are two tabs, one on the left and one on the right. These tabs fully secure the panel in place. The trick is to use a flat-head screwdriver under the plastic to gently lever the tabs out of the way.  Note in the pictures how I approach these tabs with my screwdriver.  I usually release the left side first, and then I release ...

Fixing my Wahl 9918 Groomsman Beard and Mustache Trimmer

Not everyone would bother repairing a $25 beard trimmer, but why not fix something for under $5 instead of spending another $25? My  Wahl 9918 Groomsman Beard and Mustache Trimmer  has admirably performed its beauty duty for many years, but the time came when the battery just wasn't holding a charge any more.  Most people would just put the trimmer in the trash and buy a new one, but I figured I could repair my otherwise excellent Wahl and save some money. In fact, even high priced trimmer and rotary shaver brands, like Norelco and Remington, can be easily repaired using a process similar to the one I used to fix my Wahl.  Read on to find out how. I opened up the Wahl by popping off the black plastic faceplate with a tiny flathead screwdriver, which revealed two screws.  By removing the two screws I was able to easily open up the unit, revealing the guts of the device. Backplate off, Revealing the screws The internals are rather simple: a motor, a...

Macintosh: Upgrading an eMac

It's been a long time since I wrote this article, but the fact remains: The good old eMac can still be useful if you take the simple steps to keep it as good as it can be.  All can run Tiger, and most can run Leopard - great operating systems for their day with a bit of useful life.  This article describes the procedure I used to upgrade my old eMac, including: Replacing the internal hard disk with a large capacity drive. Increasing the memory for performance Upgrading the operating system Here I'm upgrading a 700 MHz eMac, but the procedure and tasks for upgrading other eMac models should be almost identical. Upgrading versus Replacing My sister's eMac is of the 700 mhz variety, with 256 MB of memory. The machine seemed to be getting "slower", and the original 40 GB disk was becoming jammed packed with photos and iTunes, and within a few months she'd be out of disk space. There were two options to address the problems: upgrade the eMac, or go o...

Fujitsu S-Series Repair

The Patient: Fujitsu S-Series Laptop. The power connector of my S-Series Fujitsu laptop failed (a Lifebook S6110), just like so many others out there. I called up Fujitsu for repair; their local service center wanted about $80 just to look at the laptop (which obviously only needed a new connector). I concluded that it was silly for me to throw $80 at an estimate for repairing the power connector, so instead I went after repairing it myself.   Researching the problem.   At first I looked on the web for the right connector. After searching high and low, I found that the Asia Industrial Company appears to sell a very similar part, the DS-208 . Let me know if you contact them for this jack. I also saw a part for sale by a laptop power jack "repair" web site, but it didn't look like it would be mountable on my laptop's motherboard - the pins are in a different location, and I think it'd be very difficult to properly mount this part inside of my laptop.   Goi...

Fix a Lightning Cable with Heat Shrink Tubing

We've all seen a Lightning cable that has started to fall apart.  They get used every day, and after enough tugs and yanks on your iPhone, they start to fray. I've seen a lot of these frayed cables, so I've started to fix them before they break with heat shrink tube.  I get my heat shrink on Amazon, like this handy and inexpensive pack.   I prefer the heat shrink tubes without internal glue - it has higher flexibility and a smaller outside diameter once shrunk. Heat Shrink Tubing on an Old, Frayed Lightning Cable In the photo here, you'll see that I slid on a 1.25 inch length of heat shrink over the lighting connector, and then shrunk it into place.  I chose a diameter that just barely fits over the lightning connector.  In all, it took about 60 seconds to perform this repair. Warning: the white plastic of the lightning cable has a pretty low melting point.  It seems to start to melt at about 125°C (or about 250°F), which is the same temperatur...

Trendnet TEW-652BRP and DD-WRT Success!

I recently visited my dad while on a business trip when I coincidentally discovered that DD-WRT is now available for his TEW-652. The TEW-652BRP has been a great router for my father, but it isn't what I'd call "feature rich". An upgrade to DD-WRT is a big bonus. I live 2500 miles away from my non-technical father, and so a well-specified router that helps me manage his network remotely is important to both of us. This article will explain what I did to finally get DD-WRT working on my TEW-652BRP v1.0R. About the TEW-652brp It's a nice looking little black 802.11n, 2.5 GHz router. It was amazingly inexpensive (usually way under $30), and  the TEW-652brp is available through Amazon. Mine is a version 1.0R, you'll likely want the same version. Out of the box, it works quite well - it has been stable, and I was fairly happy with the stock firmware. But it was short on features - I like having VPN, SSH, and flexible DHCP services on the home netwo...

Other Posts

Show more