Dishwasher Water Fill Problem Repaired with a Plumbing Flush!

A few months back my dishwasher started to get noisy.  The wash cycle was taking a very long time, and  the dishes were coming out dirty. This turned out to be a water fill problem due to debris in my home's hot water pipes. In the end I solved my dishwasher's problem by flushing my home's hot water pipes.  Here is how I solved this problem.

Dishwasher Problem Diagnosis

After a few weeks of awful dishwasher behavior, I ended up opening its door in the middle of a cycle to see what was going on. It sure did look and sound like it was trying to pump water around, but it was clear that the spray was minimal.

At first I imagined the problem was due to a clogged dishwasher filter or bad pump, but after disassembling all those things it was clear they were not the problem.

Then I started to suspect that the dishwasher simply wasn't filling up with enough water.

There was an easy way to test it: just add water. So at the start of a cycle I'd add about a liter of water and then close it up so it could finish the fill cycle. It worked great! This was strong evidence that something was wrong with the filling process.

Was it a clogged fill valve screen, or just a fill valve that was not properly opening? That's what everyone seemed to think, so I replaced the water inlet valve. It didn't help. And at that point, I recalled that my kitchen sink's hot water tap seemed to be slowing down too. Hm.

Further study showed that the dishwasher filling was based on a timer. It would fill up until the float sensor was triggered, or 95 seconds. If it didn't fill up with enough water within 95 seconds, too bad, it would run with whatever water it had. 

So there we had it: the hot water flow in my kitchen was so slow that the dishwasher just gave up and would run with inadequate water.

Repair Process: Flushing Hot Water Line

Since the slow hot water was only happening in my kitchen, I concluded that there was debris in my kitchen's hot water plumbing. I could get a plumber in to clean out the water lines for $200+, but heck, maybe I could just flush out the lines myself for free. 

There are two sets of water supply piping in my home: HOT and COLD.  The HOT system is supplied by the hot water tank, and the COLD system comes directly from outside the building.  Since the dishwasher only uses the hot water system, I decided that I should flush it out the hot water pipe by reversing its flow and ejecting as much water (and hopefully debris) out. 

Setting up the flush

I disconnected both the hot and cold water flex lines to the kitchen sink's faucet and installed a 2 foot length of braided plumbing hose in their place. This created a "short circuit" between the hot and cold water systems (see the photo).  Then I turned off the hot water at the hot water tank.  At this point, the hot and cold water systems were merged together.

This setup changed how the hot water plumbing was fed: all the "hot water" taps in the house were getting nothing from the hot water tank, as its valve was closed. Instead, the hot water plumbing was being fed by the cold water pipe in my kitchen.  When I opened any hot water tap, water would be coming from the kitchen's hot water line, which was being fed from the kitchen's cold water line.
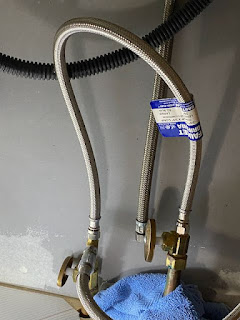
Loop of hose between hot and cold water pipes
Joining Hot and Cold plumbing systems under the kitchen sink

Performing the flush

At this point, I opened up my bath tub's hot water valve and let it flow. The thinking behind all this is that since there was was debris in my kitchen's hot water line, reversing the flow would push the debris out of the biggest hot water tap, the tub, and then it'd go down the drain.

After 5 minutes of the tub running at "full hot", I figured the pipe was as flushed as well as could be.  I did see some black pipe debris end up in the tub, so that was an indicator that something was being ejected.

Undoing the setup

After the flush, I reverted the system to its standard setup:

  1. I closed the valves under the kitchen sink.
  2. I removed the 2 foot length of hose from under the kitchen sink
  3. I reattached the kitchen sink's hot and cold water lines
  4. I opened the hot water tank valve
  5. I opened the valves under the kitchen sink

Dishwasher Repair Lessons Learned

I'm happy to say it worked! The hot water flow to the kitchen sink is now a full 20% higher than it was (yes, I measured how long it took to fill a gallon jug before and after the flush).   Now my dishwasher is functioning 100% normally.

Here is my conclusion:

  • Not all dishwasher problems are problems with the dishwasher.
  • Hiring a dishwasher repair person would not have fixed this problem.
  • Slow hot water at the tap may negatively impact a dishwasher's ability to do its job.
  • Buying a new dishwasher would not have fixed the problem.
  • A $3 length of plumbing hose can be used to temporarily reverse the flow of water supply plumbing, which can help clear debris in water supply plumbing.


Popular posts from this blog

Fixing a SodaStream Jet, part 1: Disassembly Guide

I've had my SodaStream Jet for years, and once in a while something has gone wrong. Disassembly is the first step to repair.  Start with this article to see how to disassemble the SodaStream, and then once you have that down, scroll through my other articles to see how I repaired specfic SodaStream problems. SodaStream Jet Disassembly Guide Tools Required Flat head screwdriver Phillips head screwdriver 1. Remove the Carbonator.  Duh. 2. Remove the black panel lever The front big black tilt lever needs to be removed first. Removing this panel is tricky, but it isn't impossible. Looking up at the bottom of the black panel, there are two tabs, one on the left and one on the right. These tabs fully secure the panel in place. The trick is to use a flat-head screwdriver under the plastic to gently lever the tabs out of the way.  Note in the pictures how I approach these tabs with my screwdriver.  I usually release the left side first, and then I release ...

Fixing a SodaStream Jet, Repair #2 - Broken Fill Button

My Soda Stream Jet's fill button broke, which means I can not longer carbonate water by pressing the pushbutton. This caused all sorts of grief in my household. Here is how I managed to repair my Jet to give it another 10 years of life (hopefully). First, a look at the button The fill button on the top of the SodaStream is actually a simple lever. Pressing down on the button moves a pin that does the actual work of pressing open the Carbonator's valve. Unfortunately, the axis point is fairly thin and can see a lot of stress. That's where my Soda Stream button cracked. [ I think the usage tip here is "don't over-press the button like a gorilla, it doesn't do anything but put high stress on the button."] Cracked levering point of the button The Pesky Lever Retaining Pin The Fix It was pretty easy for me to replace the button: Take off the back of the Soda Stream and remove the carbonator. Push out the the button lever's steel retaining pin. This takes qu...

Sodastream Carbonator Leakage, Usage, and Weight

SodaStream 60L "Carbonator" CO2 cylinders have a specific weight when empty, plus about 410 or so grams for the CO2 they should have when they're "full".  A little while ago I went to buy a replacement Carbonator from my local hardware store. The dealer pulled a new Carbonator out of the box and sensed it was lighter than usual.  He put the "light" Carbonator in the "empty" pile and sold me a different one.  At that moment I concluded that it would be smart of me to weigh both new and empty SodaStream carbonators.  Here are the results. Weighing a SodaStream Carbonator - for both Science and Consumer Protection.       The dealer told me that sometimes the carbonators leak after they leave the SodaStream filling facility.  That means there could be an opportunity for customers like me to get ripped off! The SodaStream cylinders I buy claim to have a net product weight of 410 grams - and that means that a full Soda Stream Carbonator shou...

Fixing my Wahl 9918 Groomsman Beard and Mustache Trimmer

Not everyone would bother repairing a $25 beard trimmer, but why not fix something for under $5 instead of spending another $25? My  Wahl 9918 Groomsman Beard and Mustache Trimmer  has admirably performed its beauty duty for many years, but the time came when the battery just wasn't holding a charge any more.  Most people would just put the trimmer in the trash and buy a new one, but I figured I could repair my otherwise excellent Wahl and save some money. In fact, even high priced trimmer and rotary shaver brands, like Norelco and Remington, can be easily repaired using a process similar to the one I used to fix my Wahl.  Read on to find out how. I opened up the Wahl by popping off the black plastic faceplate with a tiny flathead screwdriver, which revealed two screws.  By removing the two screws I was able to easily open up the unit, revealing the guts of the device. Backplate off, Revealing the screws The internals are rather simple: a motor, a...

Robust Installation of an HDHomeRun Networked TV Tuner. 64 OTA channels!

I added an HDHomerun (HDHR) over-the-air (OTA) streaming box to my home network, bringing over-the-air broadcast TV to my computers, phones and tablets.  The HDHR is a big upgrade from my previous setup: using a simple "window mount" antenna directly connected to my TV. A TV-attached antenna is good for watching some TV for free, but the HDHR offers so much more flexibility. Figure 0: HDHomeRun on my basement wall   My original OTA TV setup was haphazard at best. It was finicky, ugly, and hard for other people at home to use. I would actually tape my antenna to a window whenever I wanted to watch OTA TV. Plus, it only worked on my TV and not with my other devices. I wanted a cleaner and more modern OTA setup. After looking at possibilities, I developed two goals: (1) bring my OTA TV into the modern Internet-connected era, and (2) set it up in a reliable and pretty way so that other family members wouldn't have to fool around with the antenna or anything else.  With that,...

Apple TV HD - The Best Streaming box ever

I purchased my Apple TV on its release day, in October 2015.  It continues to serve me perfectly, after nearly 10 years of active use. Although it is decidedly not the newest model of Apple TV, it does 100% of the things I want it to do without any issues.  Sure, I'd love a more modern SoC, gigabit Ethernet, Thread support, 4k video support, etc, but honestly I am not missing any of those features, so "upgrading" it today would be a waste of money.  I did sell the original Siri remote in 2023 and upgrade to the 3rd generation (USB-C) Siri remote. The original Siri remote was working great, but I figured after 7.5 years of use, it was time to get a new remote with a new battery.  I will likely upgrade my Apple TV in the future, but I can't predict when that will be.   Due to a quirk of its release strategy, this Apple TV was discontinued in late 2022, and so it is likely to be supported for several more years. A new device would have to be a leap ahead, because m...

Other Posts

Show more