Today I repaired the broken light controller of my Casablanca ceiling fan. I could turn the fan on and off, but the light bulbs stayed on whenever the fan was running. Here, I show how I easily fixed the controller board to restore normal operation for about $5.
The problem I has was this: Pushing the "light" button resulted in some flicker, but the lamp remained "on". The only way to turn off the light was to turn off the fan.
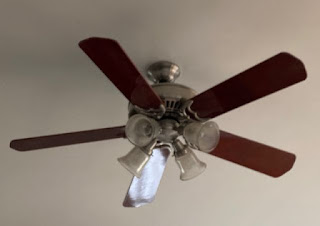 |
| One of my many Hunter / Casablanca fans with lights. |
The fan sales guy I talked to wasn't interested in repairing my broken fan. He said my only solution was to have a new fan unit installed for several hundred dollars. That'd be a shame because other than the light issue, the fan is fantastic.
Happily, I have found two ways to fix this problem for under $5.
The Repair Options
I realized that the problem was inside the fan unit, and not the "Inteli Touch" push button controls. It seems that all the "smarts" are in the fan unit, and the touch controller is pretty stupid (despite it's name). After pulling my fan off of the ceiling (more on that later), I recognized that there are two easy approaches to fix this problem.
Method 1: Fix the controller board (easy, but a bit tedious)
The controller board within the Fan unit accepts a signal from the push buttons on the wall or elsewhere and performs the high voltage switching. The actually component on the controller that turns the bulbs on or off is a Triac. If the Triac fails, then the switching no longer works properly. In my case, the triac that controlled the light was permanently stuck "on".
 |
| An inexpensive Triac sends power to the lights. |
Replacing the triac is a little bit tedious because the fan unit needs to come off of the ceiling to gain access to the controller board.
Method 2: Add a pull chain (very easy)
 |
| I added this pull chain to control the lights of my fan. |
Since my fan unit came with a wall controller, the manufacturer didn't bother to add a pull chain switch. But if it had a pull chain switch, I could use it to control the light bulbs. This option is super-easy because there was already a spot on my fan to install the pull chain.
By adding a $5 chain switch, I could control the lights despite the broken Triac.
The beauty of this approach is that the entire fan does not need to be removed from the ceiling, saving time.
Again, the details are below.
My Approach: Do both!
I ended up replacing the broken triac and adding a pull chain swtich. Since I removed the fan unit to get at the controller, it was a perfect opportunity to also add the pull chain switch. If I were feeling a bit lazier, I would have just left the Triac and the fan alone, and simply have added a pull chain.
So without further chatter, here are the Casa Blanca fan repair procedures.
OPTION 1: Repairing the circuit board with a replacement Triac.
If
it is important to control the light using the remote switch, then I needed to replace the failed Triac. This is a bit involved as the CP9605R control board is located within the Fan unit.
Tools and Parts Needed
- A BTA08-600C TO-220 Triac. This is a Triac device in a TO-220 package. I bought a 10 pack because I needed two (two broken fans) and it ended up being less expensive to buy 10. Plus now I have plenty of spares.
- A soldering kit. Soldering Iron, Solder, Solder Braid, and associated tools. It's amazing how inexpensive these kits have become.
- Decent screwdrivers. Basically, all I needed here was a medium-sized Phillips-head screw driver and a medium sized slotted screw driver. You likely already have some. As you've heard me say before, it is well worth buying a quality set of drivers. They do wear out!
- Needle nose pliers. Handy for squeezing small things. In this case, I used them to squeeze off nylon standoffs.
Triac Replacement Steps
No single step is hard, but it took me about an hour of effort to replace the triac. The following is the procedure.
Turn off all power to the fan at the circuit breaker.
Remove Fan Blades and Light Dome before removing unit from ceiling
Using a Phillips head screw driver, remove each of the fan blades. Each blade has two screws. It's easy. Similarly, remove the light dome, which is generally held in place with two screws. Detach the two wires that feed the light unit.
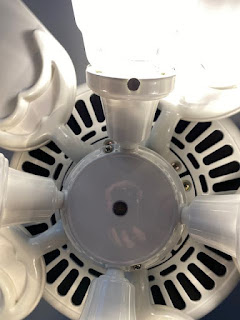 |
| Several fan blade screws and both light dome screws are visible in this picture. |
Remove the Ceiling Fan Mounting Plate Cover
Generally, a clip or a single screw holds a small portion of the mounting plate in position. Removing this small cover (not the entire plate) gives access to the wiring.
By tilting the fan, it is easy to pop off this little triangle.
Detach Wiring
Remove Fan motor from Ceiling Plate. Note: it is a bit heavy.
Now with the wires detached, lift up the fan unit slightly and unhook it from the mounting plate. Carefully lower the unit.
Remove Fan Housing
There are four screws around the perimeter. Removing these screws allows access to the guts of the fan unit.
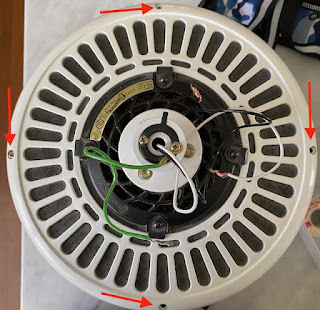 |
| The four screws need to be removed to get access to the controller board |
Remove Circuit Board Carrier
There are two wire harnesses going to the control board. Unplug them from the control board.
There are two screws that hold the control board carrier to the unit. Remove them.
Withdraw the control board and its carrier.
 |
| The
controller board in its carrier. The carrier needs to be removed, and
then the board removed from the carrier. Triac bolt noted. |
Remove Circuit Board from Carrier
Remove the small bolt that holds the triac to the aluminum carrier.
Using needle nose pliers, un-clip the nylon standoffs from the carrier.
Now the circuit board should be free from its carrier.
Remove the lamp-controlling Triac (Q4 on my fan)
Using cutters, remove the Q4 Triac from the board.
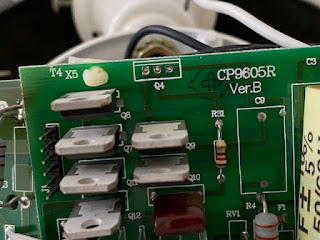 | |
| The dead triac was in position Q4. I removed it here. |
Using a soldering iron and desoldering braid, remove the old pins from the triac and remove old solder from the three holes.
 |
| The removed Triac |
 |
| The cleaned-up solder holes. |
Solder new Triac in place
Put the new Triac in place. Solder it and clip the legs so it looks like the old triac did.
 |
| New Triac, ready for solder |
 |
| New Triac installed! |
Reverse Disassembly
Redo everything. The only hard part of reassembly is aligning the long housing screws. I did this by looking in the small gap (shown) and carefully locating each screw. After each screw was partially threaded, I drove them all home.
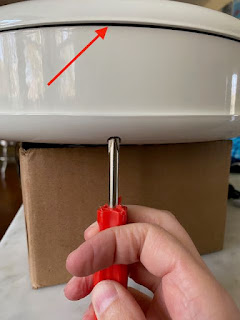 |
| Use the gap to locate the screws. Note cardboard box used to support the awkward fan unit. |
Finishing Up
Installation
onto the ceiling is basically the same process in reverse. Make sure
no parts are missing or left over. From there, a basic test shows that
light control is 100% back to normal. A huge savings!
OPTION 2: Adding a Pull Chain Switch to Control the lights
This is the easiest approach to add back light control, as there is no need to remove the fan unit from the ceiling. Note that some Casablanca light domes have a different design, so this repair option might not work for your unit.
Tools and Parts Needed
- A ZE-109 ceiling fan pull chain light switch. I bought this two-pack from Amazon. They fit my fan perfectly and they are very inexpensive.
- Optionally, a Chain Pull makes it easier to pull the chain
- Wire nuts, like these. I needed just one, but I bought a box of them which basically means that I have a wire nut supply that will last the rest of my life.
- Electrical tape, just to keep everything neat and together. I like color tape because it can be used for all sorts of things, although I only used black on this project.
- Decent screwdrivers. Basically, all I needed here was a medium-sized Phillips-head screw driver and a medium sized slotted screw driver.
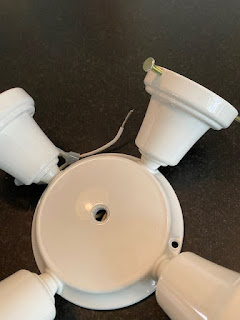 |
| The light dome removed from the Fan unit. |
Pull Chain Installation Steps
Remove Light Dome
- Turn off the power to ensure there is no power at the fan.
- Unscrew the two screws from the dome's perimeter that hold on the light dome fixture.
- Remove the two wires, detaching the dome from the fan unit.
Prepare Light Dome
- Remove the bulbs and any shades
- Clean the dome and shades, as they're likely a bit dusty. Now is the time to clean them.
- Remove the center screw from the dome using the slotted screw driver.
Install the switch
- Remove the threaded collar from the new chain switch. The collar won't be necessary, so set it aside. Carefully screw the switch into the screw hole in the center of the dome. Make it nice and snug, but there is no need to overdo it.
- Twist together one of the black wires of the switch to the black wire of the lamp dome. Secure it with a wire nut. Then use electrical tape to lock it all in place.
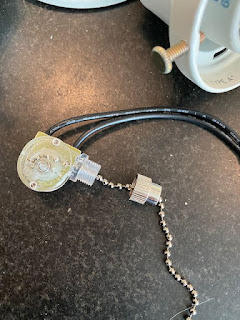 |
| The switch screws directly into the fixture, so the collar is not required. |
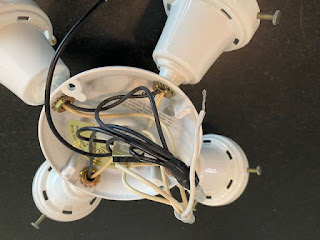 |
| The switch is screwed into place and the switch is wired for use |
Finishing Up
At this point we have the dome with the pull switch, and we will should have one exposed white wire and one exposed black wire. Now we just re-install the dome:
- Reconnect the white and black wires to the fan unit using wire nuts and tape
- Screw the light dome back in place using the two Phillips head screws
- If you want to dress it up the final product more, you might want to add a chain pull.
Test and enjoy the control over your lights.