Making a laundry equipment pedestal platform on the cheap

My concrete basement floor is very uneven, and so my laundry washer and dryer were bouncing all over the place. I solved this problem by making an inexpensive pedestal for my laundry machines. This post is about how I designed and made my laundry pedestal. It cost me less than $25 to make, and took about 30 minutes to build.

A pedestal has numerous benefits: 

  • It gives the equipment a perfectly level surface to sit on.
  • It raises the machines so that they are easier to access.
  • If there is a basement flood, a pedestal raises the machines out of harm's way
  • It is very inexpensive. I made mine for about $25 in materials.

Laundry Pedestal Design

My pedestal is basically a piece of 3/4 inch plywood with an underlying frame made of 2x4 lumber around it to give it some structure. Then I mounted robust adjustable feet on each corner. In order to easily adjust the feet while the platform was sitting on the floor, I drilled four holes in each of the corners, directly above the adjusters. These holes let me adjust the feet with a hex wrench.
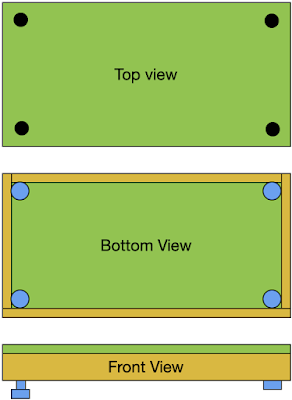
Laundry Equipment Platform Drawing
Figure 1: Three views of my platform design (not to scale)


Materials Required

  • A sheet of 4x8 plywood, cut down to the desired size
  • Some 2x4 lumber, cut to size
  • Four adjustable feet
  • Some screws

Tools Required

  • Wood saw
  • Power drill
  • Screwdriver
  • Level

Construction Process

  1. Go to lumber store and get a 4x8 sheet of 1/2 inch or 3/4 inch plywood.
    • If you are like me, it is a pain to transport a full sheet of plywood, and it is a pain to cut it at home. Most stores will cut it on their panel cutter for free - very fast, very straight, and no sawdust mess to clean up. I had them make two cuts, so I ended up with one 3 foot x 5 foot platform - big enough for the two machines side-by-side and plenty of depth, and small enough to fit into the back seat of my car. I also ended up with some useful scrap pieces of plywood (1x5 feet & 3x4 feet) for future projects. 
  2. Get three 8 foot 2x4.
  3. Bring it all home.
  4. Add the bracing made out of 2x4 lumber, mounted around the perimeter of the board. This structure prevents the panel from flexing. Note that the weight of the machines is generally around the perimeter and not in the center. Screw the 2x4 braces to the board using appropriate screws. Optionally, glue together in order to make the structure more rigid. Optionally, add more 2x4 bracing to the bottom to make more rigid / less flexible.
  5. Get some hefty steel adjustable feet, like these from Amazon. Screw them to the corners of the structure.
  6. Place the platform. Using the adjustable feet, make it perfectly level. Once set, I used both locknuts and locktite on the adjusters to help ensure that vibration doesn't cause them to turn on their own.
  7. Adjust the laundry equipment feet so they're all level too. Put the equipment on top. Double check that everything is nice and level.
  8. I fashioned a brace to prevent the entire platform from shifting on the floor if the machine loads become unbalanced.
  9. I also fashioned a removable lip around the unprotected edges, in case the washer starts to work its way towards the edge and fall off. I made the lip removable in the case I want to pull off the washer for maintenance/repair/replacement.

Since my platform is in the basement, I didn't paint it. I suppose one can paint or stain it for protection and/or style. I didn't bother. I'm pretty sure it'll outlast me even without paint.

That's it! Have fun!


Popular posts from this blog

Fixing a SodaStream Jet, part 1: Disassembly Guide

I've had my SodaStream Jet for years, and once in a while something has gone wrong. Disassembly is the first step to repair.  Start with this article to see how to disassemble the SodaStream, and then once you have that down, scroll through my other articles to see how I repaired specfic SodaStream problems. SodaStream Jet Disassembly Guide Tools Required Flat head screwdriver Phillips head screwdriver 1. Remove the Carbonator.  Duh. 2. Remove the black panel lever The front big black tilt lever needs to be removed first. Removing this panel is tricky, but it isn't impossible. Looking up at the bottom of the black panel, there are two tabs, one on the left and one on the right. These tabs fully secure the panel in place. The trick is to use a flat-head screwdriver under the plastic to gently lever the tabs out of the way.  Note in the pictures how I approach these tabs with my screwdriver.  I usually release the left side first, and then I release ...

Fixing my Wahl 9918 Groomsman Beard and Mustache Trimmer

Not everyone would bother repairing a $25 beard trimmer, but why not fix something for under $5 instead of spending another $25? My  Wahl 9918 Groomsman Beard and Mustache Trimmer  has admirably performed its beauty duty for many years, but the time came when the battery just wasn't holding a charge any more.  Most people would just put the trimmer in the trash and buy a new one, but I figured I could repair my otherwise excellent Wahl and save some money. In fact, even high priced trimmer and rotary shaver brands, like Norelco and Remington, can be easily repaired using a process similar to the one I used to fix my Wahl.  Read on to find out how. I opened up the Wahl by popping off the black plastic faceplate with a tiny flathead screwdriver, which revealed two screws.  By removing the two screws I was able to easily open up the unit, revealing the guts of the device. Backplate off, Revealing the screws The internals are rather simple: a motor, a...

Fixing a SodaStream Jet, Repair #2 - Broken Fill Button

My Soda Stream Jet's fill button broke, which means I can not longer carbonate water by pressing the pushbutton. This caused all sorts of grief in my household. Here is how I managed to repair my Jet to give it another 10 years of life (hopefully). First, a look at the button The fill button on the top of the SodaStream is actually a simple lever. Pressing down on the button moves a pin that does the actual work of pressing open the Carbonator's valve. Unfortunately, the axis point is fairly thin and can see a lot of stress. That's where my Soda Stream button cracked. [ I think the usage tip here is "don't over-press the button like a gorilla, it doesn't do anything but put high stress on the button."] Cracked levering point of the button The Pesky Lever Retaining Pin The Fix It was pretty easy for me to replace the button: Take off the back of the Soda Stream and remove the carbonator. Push out the the button lever's steel retaining pin. This takes qu...

Adding a Water Flood Sensor to my Vista-20p alarm system

My Honeywell Vista 20p alarm system is fairly comprehensive, but I want one more feature: an alarm that lets me know when my sump pump isn't working properly. Here is how I added one for about $8 in special parts.   I'm afraid of a flood in my finished basement. I'm fortunate - my basement sump pump system is already redundant, with two independent pumps and two outflow pipes. The primary pump kicks in when the water level reaches 6 inches, and if that doesn't work, then the backup pump kicks in when the water level reaches 7 inches.  The backup pump should never kick in unless the primary pump is having a problem pumping.   But there is a problem with this setup: I might never know if my primary pump has failed, leaving me with no redundancy.  I want to be informed when I have one (or god forbid, two) pump failures. My goal is to have my Vista 20p alert me when the sump's water level is ever beyond the point where my primary pump should have kicked in, alertin...

CFL Globes: Good and Bad

Some Globe-style CFLs are sucky. As you know from reading my blog, I'm a fan of not throwing away my hard-earned cash. So it was obvious for me to replace my incandescent bulbs with much more efficient CFL bulbs. My conversion saved me quite a bit of money, but there was one trouble-spot: the CFL globes I installed in the bathroom. I have one of those old-fashioned bar fixtures in the bathroom, designed for a set of three exposed globe-style bulbs, and so only globe style bulbs would look right in the fixture. I use my bathroom quite a bit, and the fixture with incandescent bulbs would normally require 180 watts to power (3 bulbs @ 60 watts each). Replacing them with CFLs seemed like an easy target for reducing electricity costs. "No problem!" I thought, since globe CFLs are readily available in retail stores. My 1980's Style Bathroom Light Bar with Globe CFLs. GE CFL in the center, Sylvanias on each side. I bought a set of three 14 Watt "Commercial Electri...

Robust Installation of an HDHomeRun Networked TV Tuner. 64 OTA channels!

I added an HDHomerun (HDHR) over-the-air (OTA) streaming box to my home network, bringing over-the-air broadcast TV to my computers, phones and tablets.  The HDHR is a big upgrade from my previous setup: using a simple "window mount" antenna directly connected to my TV. A TV-attached antenna is good for watching some TV for free, but the HDHR offers so much more flexibility. Figure 0: HDHomeRun on my basement wall   My original OTA TV setup was haphazard at best. It was finicky, ugly, and hard for other people at home to use. I would actually tape my antenna to a window whenever I wanted to watch OTA TV. Plus, it only worked on my TV and not with my other devices. I wanted a cleaner and more modern OTA setup. After looking at possibilities, I developed two goals: (1) bring my OTA TV into the modern Internet-connected era, and (2) set it up in a reliable and pretty way so that other family members wouldn't have to fool around with the antenna or anything else.  With that,...

Other Posts

Show more