My friend was low on space on his MacBook Air, and he was always complaining about it.
This is how I upgraded his MacBook Air from 128 GB of internal storage to 500 GB.
The MacBook in question is a 2012 MacBook Air, the small 11 inch model. It is a great laptop, and at the time of purchase he thought he'd only need 128 GB of storage. Then he had a baby, and the number of baby pictures grew and grew. Soon he was out of space.
Apple normally wants you to buy a new laptop in this situation, or sign up to a special iCloud subscription. But there is a solution!
M.2 SATA style SSD.
The heart of this upgrade is a new SSD. But only a few SSDs will fit in a 2012 MacBook Air.
For this project, I ended up buying this Western Digital 500 GB M.2 drive for about $125. It is a SATA SSD drive with an M.2 form factor, and it is thin, since components are only on one side of the card. These are "musts" for a MacBook Air upgrade
"M.2" to "2012 MBA SSD" adapter (required)
This is the magic adapter, and its absolutely necessary to perform this upgrade. It allows a standard M.2 SATA drive to plug into the MacBook Air. They are available from Amazon for about $12, as seen here.
Proper screw drivers
For this project, I needed a proper set of screw drivers. Unlike many pundits, I think this is a good idea that Apple uses special screw heads, as they discourage those that only buy tools from Home Depot from getting ahead of themselves.
In particular, I needed two special drivers: A P5 Pentalobe driver for removing the screws on the bottom of the MacBook Air, plus a Torx T5 driver for removing the SSD.
Pros will use the right screwdrivers. Conversely, idiots will use the wrong drivers to mangle the screwheads and leave themselves with an embarrassing nightmare. I like this screwdriver kit: http://amzn.to/2uVMQYC
Drive Adapters
It's nice to be able to move your data from your old drive to your new drive. These adapters are very affordable and very useful. They aren't absolutely required, but I think most upgraders will want them in order to easily migrate data from their old drive to their new drive.
"2012 MBA SSD" to "standard SATA" adapter (recommended)
Once you pull out your old SSD from your MacBook Air, it won't natively fit into anything else except another MacBook Air. This adapter makes an exception to that rule. It allows you to take a "loose" MBA SSD and plug it into a standard SATA interface. These are available from Amazon for about $12, as seen here.
"M.2 SATA" to "standard SATA" adapter (recommended)
If you buy a standard M.2 SATA SSD, you might want to externally connect it to your Mac. This adapter takes the M.2/NGFF interface and converts it into a standard SATA interface. About $12 on Amazon.
"standard SATA" to USB adapter (recommended)
Most laptops don't have a readily-available SATA port, so most external drives plug into the USB port. This adapter allows you to plug a SATA drive, like the above adapters, into a USB port. About $8 on Amazon, and is extremely useful even outside this project.
Step 1: Copy Data to the New SSD
Step 2: Prepare new SSD for use in the Mac
Step 3: Install the SSD into the MacBook Air
Step 4: Dealing with the removed SSD
Step 5: Finishing Up
Now that the new SSD is installed, I power up, test, and configure:
This is how I upgraded his MacBook Air from 128 GB of internal storage to 500 GB.
 |
| Upgraded SSD Drive in my MacBook Air |
The MacBook in question is a 2012 MacBook Air, the small 11 inch model. It is a great laptop, and at the time of purchase he thought he'd only need 128 GB of storage. Then he had a baby, and the number of baby pictures grew and grew. Soon he was out of space.
Apple normally wants you to buy a new laptop in this situation, or sign up to a special iCloud subscription. But there is a solution!
Stuff needed for the upgrade:
There are some basic items I needed to upgrade this MacBook Air. Fortunately these items are inexpensive! A tech-oriented person might even have a few in their cabinet already, but if not, then no big deal.M.2 SATA style SSD.
The heart of this upgrade is a new SSD. But only a few SSDs will fit in a 2012 MacBook Air.
For this project, I ended up buying this Western Digital 500 GB M.2 drive for about $125. It is a SATA SSD drive with an M.2 form factor, and it is thin, since components are only on one side of the card. These are "musts" for a MacBook Air upgrade
"M.2" to "2012 MBA SSD" adapter (required)
This is the magic adapter, and its absolutely necessary to perform this upgrade. It allows a standard M.2 SATA drive to plug into the MacBook Air. They are available from Amazon for about $12, as seen here.
Proper screw drivers
For this project, I needed a proper set of screw drivers. Unlike many pundits, I think this is a good idea that Apple uses special screw heads, as they discourage those that only buy tools from Home Depot from getting ahead of themselves.
In particular, I needed two special drivers: A P5 Pentalobe driver for removing the screws on the bottom of the MacBook Air, plus a Torx T5 driver for removing the SSD.
Pros will use the right screwdrivers. Conversely, idiots will use the wrong drivers to mangle the screwheads and leave themselves with an embarrassing nightmare. I like this screwdriver kit: http://amzn.to/2uVMQYC
Drive Adapters
It's nice to be able to move your data from your old drive to your new drive. These adapters are very affordable and very useful. They aren't absolutely required, but I think most upgraders will want them in order to easily migrate data from their old drive to their new drive.
"2012 MBA SSD" to "standard SATA" adapter (recommended)
Once you pull out your old SSD from your MacBook Air, it won't natively fit into anything else except another MacBook Air. This adapter makes an exception to that rule. It allows you to take a "loose" MBA SSD and plug it into a standard SATA interface. These are available from Amazon for about $12, as seen here.
"M.2 SATA" to "standard SATA" adapter (recommended)
If you buy a standard M.2 SATA SSD, you might want to externally connect it to your Mac. This adapter takes the M.2/NGFF interface and converts it into a standard SATA interface. About $12 on Amazon.
"standard SATA" to USB adapter (recommended)
Most laptops don't have a readily-available SATA port, so most external drives plug into the USB port. This adapter allows you to plug a SATA drive, like the above adapters, into a USB port. About $8 on Amazon, and is extremely useful even outside this project.
My Upgrade Process, in pictures
My first step is to migrate data off my MacBook Air. I do this first, before opening up the Mac.Step 1: Copy Data to the New SSD
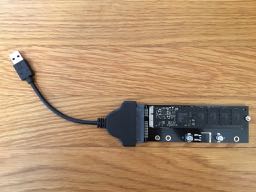
 |
| New SSD in the "M.2 to SATA" adapter, which is plugged into the SATA to USB adapter. |
 |
| Plugged the new SSD into the Mac and migrated data to new drive (see "Migration") |
Step 2: Prepare new SSD for use in the Mac
 |
| Now I install the M.2 SSD into its adapter, and gently screw it into place with the single screw. |
Step 3: Install the SSD into the MacBook Air
 |
| Now I remove the back |
 |
| Back cover off. |
 |
| Unplug battery |
 |
| There is the original SSD. Removing the Torx screw helps free it. |
 |
| The empty slot, ready for a new drive |
 |
| The new drive, in its Adapter, in the MBA! |
 |
| The new drive, in its Adapter, in the MBA! Now we put everything back together. |
 |
| Now the old SSD goes into its adapter, to be repurposed or sold |
Step 5: Finishing Up
Now that the new SSD is installed, I power up, test, and configure:
- Power on the Mac. Booting will take longer than normal as it searches for the old drive.
- Go into Disk Utility and validate new storage.
- Go into System Preferences, and choose Startup Disk. Choose the new drive and reboot. This will speed up boot times.
- Go into terminal. Type "sudo trimforce enable". This will enable TRIM, which will speed up the SSD.
- Test test test. Use the new drive for a week or so before unloading or erasing the old SSD.