Today I'll show you how I go about to repair and clean Mac keyboards. This procedure is particular to the Apple white USB and Bluetooth keyboards, but a similar procedure should work on most other standard PC keyboards.
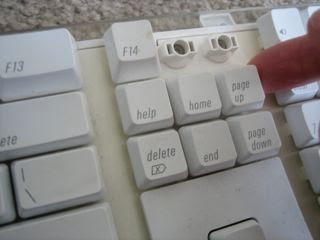
 My yukky keyboard being dismantled
Keyboards are generally highly reliable devices, but they do have the nasty habit of collecting gunk that can make keys stick, or worse, completely non-functional. This guide shows you how to fully clean your keyboard so that it can be as good as it can be.
 My recently cleaned Apple Keyboard - like new again!
Remember, some great keyboards can be found for under $30, so if you don't want to risk surgery, consider buying something like the Macally Keyboard and give your crusty console to someone who is willing to clean it up and give it a new life.
What you will need:
Getting Started
The first thing you want to do is find yourself a nice work surface. Make sure that you don't have any junk around - these keyboards have over 100 hundred parts, and you don't want to lose any.
Take a photograph of your keyboard. You'll want this picture so that you can easily restore the keys to their original location. Without a picture, you'll do a lot of guessing.
Removing the Small Keys
We're going to remove all the keys from the keyboard. This is easier than it sounds - the trick is to start with all the small keys. But for sanity's sake, we'll pop off each small key with a little upward pressure. Don't take off the larger keys, such as Shift, Delete, or the Space Bar! Stick with the smaller square shaped keys. Apply upward pressure to the left or right side of the key and lever it up gently. Don't apply too much pressure or else you'll break the key's stem. I usually start from the right side, as it is easier to get some purchase from that side. If you have trouble popping off the keys with your fingers, use a pen to help pop off the key.
As you remove keys, put them into your container.
Pulling off the tricky big keys
Once all the small keys are off, we're going to go after the bigger ones. Many of the large key have a metal bar underneath them. This bar keeps the large key's top surface parallel with the rest of the keyboard. Without the metal support bars, the keys would rock around, resulting in a lousy feel.
Pulling off a large key requires special care. Lever up the key gently from the center-rear of the key. Once the key is released, make sure that the support wire is released from the base of the keyboard. The goal is to remove the key with its support wire. Keep the support wire attached to the key. Do not bend the wire or break the hooks found on the base of the keyboard. Again, put all the large keys with their support wires into your container. Be particularly careful with the space bar.
Repeat this process until all of the keys are removed.
 The Delete Key with support wire - a source of keyboard squeaks

Cleaning the Keyboard Base
Next we're going to clean the keyboard base. Take a vacuum cleaner with an upholstery attachment and vacuum up all of the dirt, hair, food, and whatever else it there. Use an old tooth brush to knock off any really sticky stuff. Then use a damp (not wet!) kitchen sponge to clean off the rest of the crud on the base. Then set the keyboard base aside.
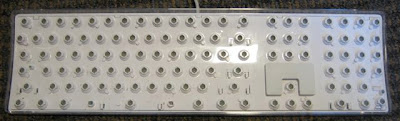
 The yukky keyboard base... ready for cleaning.
Phew! That looks a lot better! Not perfect, but good enough for me!
Proper Washing of the Keys
Now it's time to clean the keys. Put a spoonful of dishwasher detergent into your plastic container and add plenty of warm water. Seal the container and shake as if you were on an entire episode of Soul Train Dance Party.
 Keys, Dishwater Detergent, and Water all in a nice sealed container.
Now your keys will be as clean as can be. Drain the container into a strainer and rinse them well with plenty of warm water.
 Keys being rinsed off in a colander.
Once rinsed, inspect the keys for cleanliness. If they're still dirty, repeat the washing exercise. If not, set them aside on a towel so that they can fully air dry.
 Air drying all of the keys. Make sure they're fully dry before reinstalling them!
Re-Greasing and Reassembly
Now you have a clean keyboard base and clean keys. Now we'll put it all back together again. This time, we'll install the large keys first (the ones with the metal support wires), and secondly we'll install the small square-shaped keys. Orientation is important - I hope you have that photo handy!
Stopping the Squeak of your spacebar
Sometimes you'll find that your keys squeak a bit. This is due to the movement of the metal bars against the plastic of the keys and/or keyboard base. For the large keys, you may want to re-grease the metal bars with a TINY amount of silicone grease where the plastic touches the metal. There are four points on each metal bar to grease - two where the key grabs the bar, and two where the bar slides under the hooks on the keyboard's base. Do NOT over grease your keyboard - it'll just gum up your keyboard later as it collects dirt. If in doubt, forgo the grease.
To install a large key, set the pins of the bar under the the hooks on the keyboard base, and then pivot the keys so that they hover over their receptacle. Then press down on the center of the key until the key clicks in place. Only a little pressure is required - if it seems to hard to press, STOP and make sure that everything is lined up correctly.
Once all the large keys are in place, start installing the small keys. It's easier to start from the corners, but I manage to do it haphazardly. Just get the right keys in the right holes, and make sure the keys are oriented correctly. The hardest part for me was the number pad keys versus the number-row keys, but they are quite different if you look hard enough.
In the end, you should have a solid keyboard with all keys nicely in place. Give it one more physical inspection to make sure that everything looks right and that all the keys move smoothly.
Congratulations! You've refurbished your own keyboard, saving yourself $50 or so!
 My yukky keyboard being dismantled
Keyboards are generally highly reliable devices, but they do have the nasty habit of collecting gunk that can make keys stick, or worse, completely non-functional. This guide shows you how to fully clean your keyboard so that it can be as good as it can be.
 My recently cleaned Apple Keyboard - like new again!
Remember, some great keyboards can be found for under $30, so if you don't want to risk surgery, consider buying something like the Macally Keyboard
What you will need:
- A clean, uncluttered work surface
- A one quart or one liter-sized plastic or glass container with a lid.
- A ball point pen, for levering off keys
- A small towel, for air-drying keys
- A strainer, such as one used for draining cooked pasta.
- Some dish washer detergent. A spoonful will do.
- An old toothbrush
- An old kitchen sponge
- Warm tap water
- Silicone grease
Getting Started
The first thing you want to do is find yourself a nice work surface. Make sure that you don't have any junk around - these keyboards have over 100 hundred parts, and you don't want to lose any.
Take a photograph of your keyboard. You'll want this picture so that you can easily restore the keys to their original location. Without a picture, you'll do a lot of guessing.
Removing the Small Keys
We're going to remove all the keys from the keyboard. This is easier than it sounds - the trick is to start with all the small keys. But for sanity's sake, we'll pop off each small key with a little upward pressure. Don't take off the larger keys, such as Shift, Delete, or the Space Bar! Stick with the smaller square shaped keys. Apply upward pressure to the left or right side of the key and lever it up gently. Don't apply too much pressure or else you'll break the key's stem. I usually start from the right side, as it is easier to get some purchase from that side. If you have trouble popping off the keys with your fingers, use a pen to help pop off the key.

Levering up a key.
As you remove keys, put them into your container.
Pulling off the tricky big keys
Once all the small keys are off, we're going to go after the bigger ones. Many of the large key have a metal bar underneath them. This bar keeps the large key's top surface parallel with the rest of the keyboard. Without the metal support bars, the keys would rock around, resulting in a lousy feel.
Pulling off a large key requires special care. Lever up the key gently from the center-rear of the key. Once the key is released, make sure that the support wire is released from the base of the keyboard. The goal is to remove the key with its support wire. Keep the support wire attached to the key. Do not bend the wire or break the hooks found on the base of the keyboard. Again, put all the large keys with their support wires into your container. Be particularly careful with the space bar.
Repeat this process until all of the keys are removed.
 The Delete Key with support wire - a source of keyboard squeaks
The Keys
Cleaning the Keyboard Base
Next we're going to clean the keyboard base. Take a vacuum cleaner with an upholstery attachment and vacuum up all of the dirt, hair, food, and whatever else it there. Use an old tooth brush to knock off any really sticky stuff. Then use a damp (not wet!) kitchen sponge to clean off the rest of the crud on the base. Then set the keyboard base aside.
 The yukky keyboard base... ready for cleaning.
My cleaned keyboard base.
Phew! That looks a lot better! Not perfect, but good enough for me!
Proper Washing of the Keys
Now it's time to clean the keys. Put a spoonful of dishwasher detergent into your plastic container and add plenty of warm water. Seal the container and shake as if you were on an entire episode of Soul Train Dance Party.
 Keys, Dishwater Detergent, and Water all in a nice sealed container.
 Keys being rinsed off in a colander.
Once rinsed, inspect the keys for cleanliness. If they're still dirty, repeat the washing exercise. If not, set them aside on a towel so that they can fully air dry.
 Air drying all of the keys. Make sure they're fully dry before reinstalling them!
Re-Greasing and Reassembly
Now you have a clean keyboard base and clean keys. Now we'll put it all back together again. This time, we'll install the large keys first (the ones with the metal support wires), and secondly we'll install the small square-shaped keys. Orientation is important - I hope you have that photo handy!
Stopping the Squeak of your spacebar
Sometimes you'll find that your keys squeak a bit. This is due to the movement of the metal bars against the plastic of the keys and/or keyboard base. For the large keys, you may want to re-grease the metal bars with a TINY amount of silicone grease where the plastic touches the metal. There are four points on each metal bar to grease - two where the key grabs the bar, and two where the bar slides under the hooks on the keyboard's base. Do NOT over grease your keyboard - it'll just gum up your keyboard later as it collects dirt. If in doubt, forgo the grease.
To install a large key, set the pins of the bar under the the hooks on the keyboard base, and then pivot the keys so that they hover over their receptacle. Then press down on the center of the key until the key clicks in place. Only a little pressure is required - if it seems to hard to press, STOP and make sure that everything is lined up correctly.
Once all the large keys are in place, start installing the small keys. It's easier to start from the corners, but I manage to do it haphazardly. Just get the right keys in the right holes, and make sure the keys are oriented correctly. The hardest part for me was the number pad keys versus the number-row keys, but they are quite different if you look hard enough.
In the end, you should have a solid keyboard with all keys nicely in place. Give it one more physical inspection to make sure that everything looks right and that all the keys move smoothly.
Congratulations! You've refurbished your own keyboard, saving yourself $50 or so!