Every year, one person in my family is assigned to make a special thanksgiving day centerpiece for the dinner table. This year I was assigned to make something.
Fulfilling my obligation, I have created a paper mache Turkey, the center of the American thanksgiving celebration. Read on to see how to make this Thanksgiving Centerpiece Turkey, the official Pilgrim Turkey of Thanksgiving.
 Gobble Gobble! You can make me too!
Strangely, most people don't know the story of how Thanksgiving became synonymous with turkey. But first, maybe you'll want to know to build this handsome fellow...
Building the Turkey
I started with a couple small balloons, some coat hanger wire, and masking tape. I formed the body and head with the balloons and taped them together. I bent the coat hanger wire to form the beak and legs/feet. Some needle nose pliers helped me bend the wire.
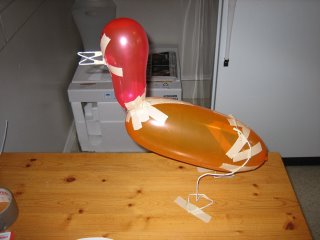 Balloons, tape and wire. Note that I taped the feet to my work surface.
 The beak frame. I drew a face on the "head" baloon so I could position the beak, then I taped the beak wire frame in place.
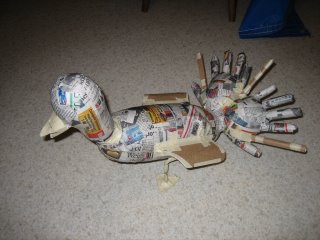 With a coat of paper mache, the bird starts to take shape
I built a small hat out of a tube of cardboard and masking tape. I coated the tube with more paper mache in order to provide uniformity and to hide tape and gaps.
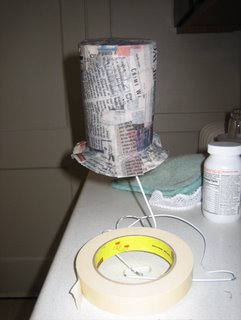 The Hat: papier mache coated cardboard
I took the whole project outside and sprayed it with a couple coats of brown spray paint. Being all brown, he looked like a giant chocolate turkey! Whoops! After the spray, I took him inside and gave it a final coat of brown with some brush-on paint, giving him a little more tecture than what the spray paint could provide.
Next, I painted the hat, and the details like the eyes (white paint with sharpie-black pupils).
Finally, I used a small, red deflated balloon to create his attractive wattle (a.k.a. "gobbler" or "flabby thing on his head")
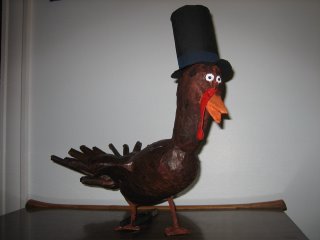
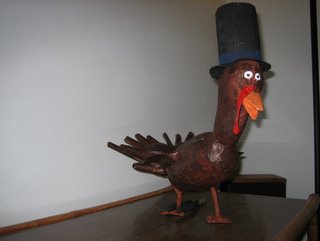 The Pilgrim Turkey Project: Complete!
The Myth of the American Turkey
In the year 1584, Captain John Smith, a military officer and patriot, came to America in order to support the colonists with their admittedly poor farming skills. Times in America were tough - there wasn't much food, and many families were starving. But Smith was an avid amateur farmer, and before long he grew thousands of bushels of potatoes, cranberry, apples and corn for all of the people.
One of John Smith's duties was that of providing entertainment. He wasn't a particularly good at entertainment, and he decided that he'd have a big dinner party for "everee God-feering man and wo-man in thee towne". While walking to the feast, with his potatoes, cranberries and corn, Smith saw and captured a giant wild turkey, "so giantik and bulbous a beast that he shalt feed hundredsuch plainfolk".
Smith brought the huge turkey to the thanksgiving celebration where he met Pocahontas, the beautiful and petite Native American princess and avid gambler. On a wager with Smith, Pocahontas attempted to ride on the back of the giant bird, and found, in fact, that she could. Being a princess, she immediately exercised her pardoning privilege and pardoned the turkey from eating. She promptly left for home on the back of the turkey.
Pocahontas became the first domesticated turkey farmer in America - and in fact, every domestic American turkey is a decendant of the turkey that Pocahontas saved. Pocahontas later travelled to England to sell turkey meat, but that's another story.
Every thanksgiving, the President of the United States cerimonially pardons the thanksgiving turkey in memory of Pocahontas, John Smith, and their giant pilgrim turkey.
Fulfilling my obligation, I have created a paper mache Turkey, the center of the American thanksgiving celebration. Read on to see how to make this Thanksgiving Centerpiece Turkey, the official Pilgrim Turkey of Thanksgiving.
 Gobble Gobble! You can make me too!
Strangely, most people don't know the story of how Thanksgiving became synonymous with turkey. But first, maybe you'll want to know to build this handsome fellow...
Building the Turkey
I started with a couple small balloons, some coat hanger wire, and masking tape. I formed the body and head with the balloons and taped them together. I bent the coat hanger wire to form the beak and legs/feet. Some needle nose pliers helped me bend the wire.
 Balloons, tape and wire. Note that I taped the feet to my work surface.
 The beak frame. I drew a face on the "head" baloon so I could position the beak, then I taped the beak wire frame in place.
From there, I used standard papier mache techniques to coat my beast. I made a simple flour-and water paste (boil 1/4 cup flour in one quart of water for 5 minutes; let cool) and thinly coated newspaper strips with the stuff. Then I carefully coated the bird. It took a long time to coat him - several sessions over several days. I later added some plumage in the rear using inflated latex gloves :-). I also added some stubby wings, made out of cardboard from a Trader Joe's Pizza box and (of course) more masking tape.
 With a coat of paper mache, the bird starts to take shape
I built a small hat out of a tube of cardboard and masking tape. I coated the tube with more paper mache in order to provide uniformity and to hide tape and gaps.
 The Hat: papier mache coated cardboard
I took the whole project outside and sprayed it with a couple coats of brown spray paint. Being all brown, he looked like a giant chocolate turkey! Whoops! After the spray, I took him inside and gave it a final coat of brown with some brush-on paint, giving him a little more tecture than what the spray paint could provide.
Next, I painted the hat, and the details like the eyes (white paint with sharpie-black pupils).
Finally, I used a small, red deflated balloon to create his attractive wattle (a.k.a. "gobbler" or "flabby thing on his head")
 The Pilgrim Turkey Project: Complete!
The Myth of the American Turkey
In the year 1584, Captain John Smith, a military officer and patriot, came to America in order to support the colonists with their admittedly poor farming skills. Times in America were tough - there wasn't much food, and many families were starving. But Smith was an avid amateur farmer, and before long he grew thousands of bushels of potatoes, cranberry, apples and corn for all of the people.
One of John Smith's duties was that of providing entertainment. He wasn't a particularly good at entertainment, and he decided that he'd have a big dinner party for "everee God-feering man and wo-man in thee towne". While walking to the feast, with his potatoes, cranberries and corn, Smith saw and captured a giant wild turkey, "so giantik and bulbous a beast that he shalt feed hundredsuch plainfolk".
Smith brought the huge turkey to the thanksgiving celebration where he met Pocahontas, the beautiful and petite Native American princess and avid gambler. On a wager with Smith, Pocahontas attempted to ride on the back of the giant bird, and found, in fact, that she could. Being a princess, she immediately exercised her pardoning privilege and pardoned the turkey from eating. She promptly left for home on the back of the turkey.
Pocahontas became the first domesticated turkey farmer in America - and in fact, every domestic American turkey is a decendant of the turkey that Pocahontas saved. Pocahontas later travelled to England to sell turkey meat, but that's another story.
Every thanksgiving, the President of the United States cerimonially pardons the thanksgiving turkey in memory of Pocahontas, John Smith, and their giant pilgrim turkey.