I've been receiving a lot of questions and comments on compact fluorescent light bulbs ("CFLs"). Why? Well, maybe because electricity rates are almost three times as much as they were only a few years ago!
I have replaced most of my traditional "incandescent" light bulbs with CFLs. Replacing old-fashioned bulbs with "fancy" CFL bulbs has reduced my electric bill by more than half - or hundreds of dollars per year - at very low cost.
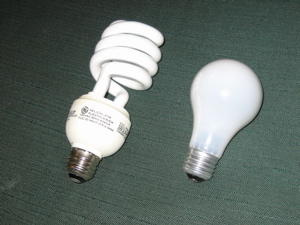
I find that a GE 27 Watt CFL (on left) is substantially brighter than the 100 watt traditional bulb (right)
CFLs are more expensive than regular light bulbs, but they use much much less electricity and last much longer. I've paid between $0.99 and $3.50 per CFL bulb, depending on the type and style.
Bulb Recommendations
I have used CFLs from various manufacturers. I have been happy with modern bulbs from LightWiz, GE, and Phillips. I purchased some bulbs from Ikea a couple years ago, and they work well too. However, I imagine that Ikea buys their bulbs from various manufacturers, and so your mileage may vary.
Some readers say that they have had premature CFL bulb failure when mounted in some enclosed ceiling light fixtures. I have never had a CFL fail, and I have several enclosed light fixtures. In any case, note that some bulbs may be labeled as "inappropriate for enclosed fixture use". I recommend that you heed the manufacturer's label.
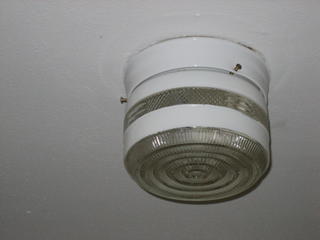
Readers report that some CFLs can fail prematurely in an enclosed light fixture like mine. After 3+ years, I haven't had a problem.
Dimmers and Timers
Most CFLs are incompatible with dimmers. If you plan to use a CFL in a dimming circuit, make sure you get a CFL that is designed and sold for use with dimmers. In my experience, a CFL on a dimming circuit wildly flickers, or doesn't work at all. I don't have any dimmers, and therefore I cannot comment on the quality of dimmable CFLs.
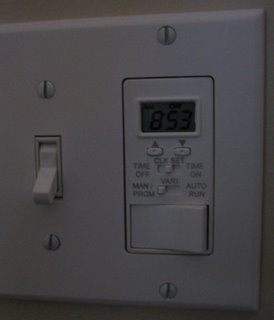
Many low-quality, over-priced wall timers don't work with CFLs due to their cheap design. The answer? Buy a Swylite LST100 wall timer - it looks great and is much more functional than the ones I've bought at the local home store. Oh, and they cost less too.
Swylite LST100 timer I bought new on eBay
Warm-Up Issues
Other readers have complained about CFL "warm up time" when a CFL takes several seconds or even minutes to get to full brightness, especially in cold temperatures. This seems to be an issue with some old-style CFLs and some lousy brands. I did have a problem with some cheapo off-brand bulbs I bought at the Home Depot in 2004. These lousy CFLs were always very slow to get to full brightness, so I put them in the basement fixtures where I don't mind the slow start time. I recommend that you stick with modern name-brand bulbs. Ask your local lighting store to show you the startup characteristics of the bulbs you're buying.
I have replaced most of my traditional "incandescent" light bulbs with CFLs. Replacing old-fashioned bulbs with "fancy" CFL bulbs has reduced my electric bill by more than half - or hundreds of dollars per year - at very low cost.

CFLs are more expensive than regular light bulbs, but they use much much less electricity and last much longer. I've paid between $0.99 and $3.50 per CFL bulb, depending on the type and style.
Bulb Recommendations
I have used CFLs from various manufacturers. I have been happy with modern bulbs from LightWiz, GE, and Phillips. I purchased some bulbs from Ikea a couple years ago, and they work well too. However, I imagine that Ikea buys their bulbs from various manufacturers, and so your mileage may vary.
Some readers say that they have had premature CFL bulb failure when mounted in some enclosed ceiling light fixtures. I have never had a CFL fail, and I have several enclosed light fixtures. In any case, note that some bulbs may be labeled as "inappropriate for enclosed fixture use". I recommend that you heed the manufacturer's label.

Dimmers and Timers
Most CFLs are incompatible with dimmers. If you plan to use a CFL in a dimming circuit, make sure you get a CFL that is designed and sold for use with dimmers. In my experience, a CFL on a dimming circuit wildly flickers, or doesn't work at all. I don't have any dimmers, and therefore I cannot comment on the quality of dimmable CFLs.
Many low-quality, over-priced wall timers don't work with CFLs due to their cheap design. The answer? Buy a Swylite LST100 wall timer - it looks great and is much more functional than the ones I've bought at the local home store. Oh, and they cost less too.

Warm-Up Issues
Other readers have complained about CFL "warm up time" when a CFL takes several seconds or even minutes to get to full brightness, especially in cold temperatures. This seems to be an issue with some old-style CFLs and some lousy brands. I did have a problem with some cheapo off-brand bulbs I bought at the Home Depot in 2004. These lousy CFLs were always very slow to get to full brightness, so I put them in the basement fixtures where I don't mind the slow start time. I recommend that you stick with modern name-brand bulbs. Ask your local lighting store to show you the startup characteristics of the bulbs you're buying.